> ## Documentation Index
> Fetch the complete documentation index at: https://faces.app/docs/llms.txt
> Use this file to discover all available pages before exploring further.
# Access Control
> Control who can view your published project: public, invited-only, or organization-wide.
## Overview
After publishing, you control exactly who can view the published URL. There are three access levels, and you can switch between them at any time.
This page is about who can **view** the published URL. To add people who can **edit** in the editor, see [Multiplayer & Collaboration](/en/guides/multiplayer).
## Access levels
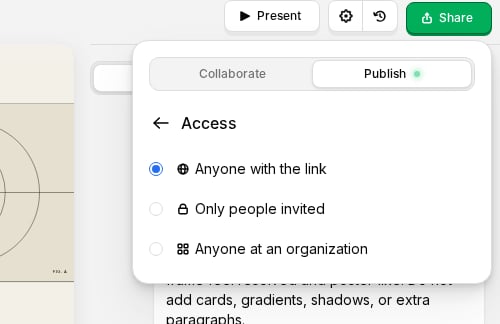 ### Anyone with the link
The default setting. Anyone who has the URL can view your project without requiring a login.
### Only invited people
Restrict access to specific people by email. Invitees must authenticate with their email to view the project.
**To invite someone:**
1. Click **Share → Publish → Settings**
2. Open **Access**
3. Select **Only invited people**
4. Enter their email address
5. They receive an invitation email with a link
### Anyone at your organization
Allow access based on email domain. For example, if you set `yourcompany.com`, anyone with a company email can view the project after signing in.
This is ideal for internal presentations, company updates, or team documentation.
## Changing access
1. Click **Share** in the editor top bar
2. Open the **Publish** tab
3. Click **Settings**
4. Open **Access** and choose the access level you want
### Anyone with the link
The default setting. Anyone who has the URL can view your project without requiring a login.
### Only invited people
Restrict access to specific people by email. Invitees must authenticate with their email to view the project.
**To invite someone:**
1. Click **Share → Publish → Settings**
2. Open **Access**
3. Select **Only invited people**
4. Enter their email address
5. They receive an invitation email with a link
### Anyone at your organization
Allow access based on email domain. For example, if you set `yourcompany.com`, anyone with a company email can view the project after signing in.
This is ideal for internal presentations, company updates, or team documentation.
## Changing access
1. Click **Share** in the editor top bar
2. Open the **Publish** tab
3. Click **Settings**
4. Open **Access** and choose the access level you want